If this is your first visit, be sure to
check out the FAQ. You may have to register
before you can post: click the register link above to proceed. To start viewing messages,
select the forum that you want to visit from the selection below.
If you have an immediate customer service issue, please visit us at Parts Express
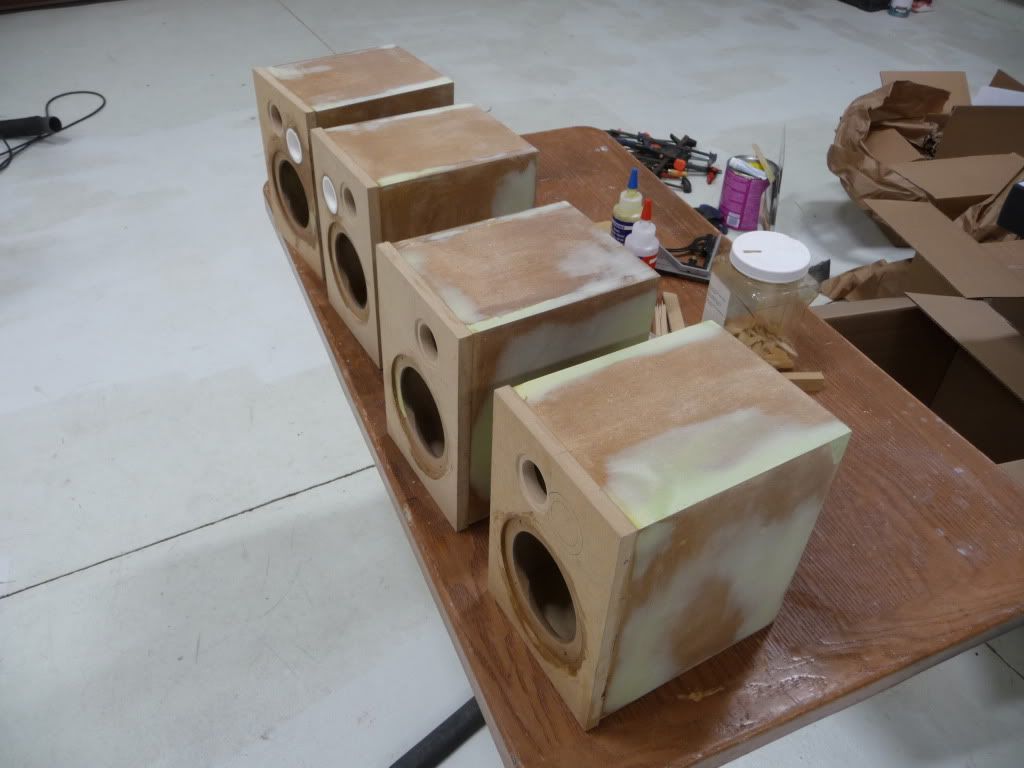
After sanding to the finished shape, the baffles were glued in place using Titebond and biscuits. Notice that the baffles are slightly larger than the enclosures -- they will be trimmed to size using a router and a flush trim bit after the veneer is applied to the rear ported pair.
I next began the veneering process. I've read in other posts that paper-backed veneer is the preferred type and as you'll see, they were right. This was to be my first attempt at veneering anything -- everything I've constructed up to this point has either been painted, or finished naturally, i.e., with the grain showing through a transparent finish coat. Actually that's not entirely correct -- I have used plastic veneers such as Formica, or Wilsonart, on a number of different projects. I went to my nearest woodworker's supply store and perused the available types. I decided to take a conservative approach and purchased a couple variety packs of the narrow (about 10") width non paper-backed stuff. I was hoping to use the Pecan veneer I could see through the clear plastic package, but after getting home I discovered that the only types available in sufficient quantity was Oak and Cherry. In retrospect, I would look for a suitable paper-backed type in the future.
After deciding to go with the Cherry veneer, I began by cutting pieces of sufficient width and size to cover the sides, top, and back. The veneer can be neatly cut using a utility knife and a straight edge, but be careful -- this stuff splinters and breaks easily. More about that later when I discuss how to repair tear-outs. I found it easier and more accurate to use a combination square as a guide, held against the edge of the work table.
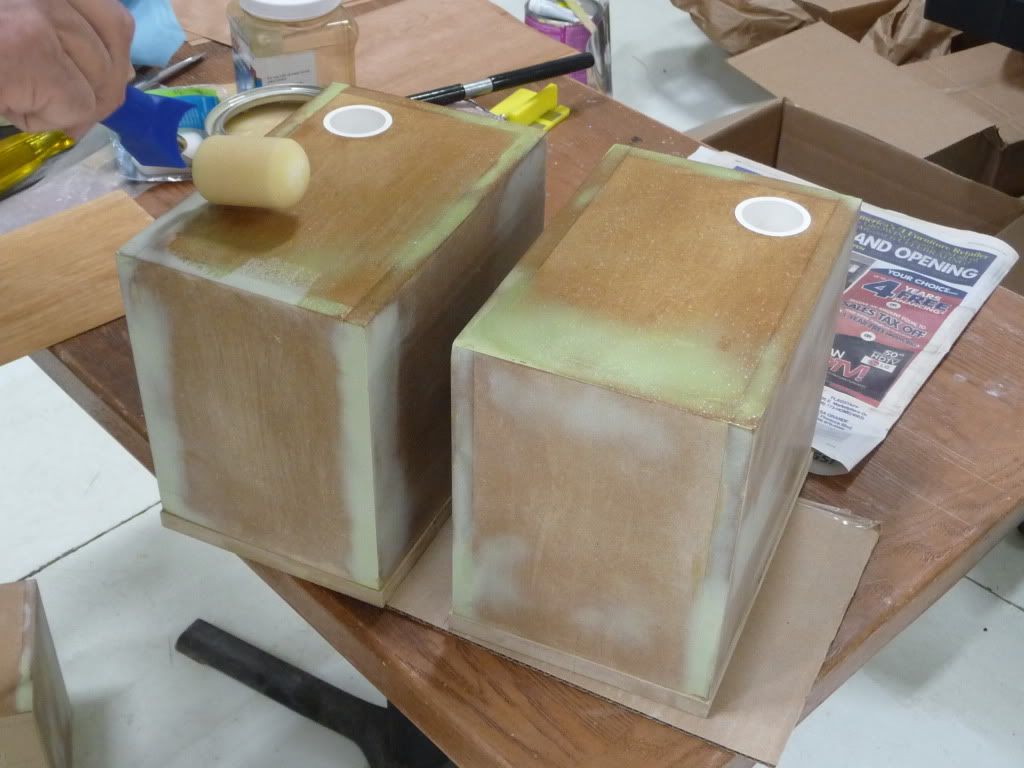
I used DAP Weldwood contact cement to glue the veneer to the enclosures, and applied it with the cheapest little foam roller I could find. Fortunately, it did not dissolve which I understand does sometimes happen. It's probably a good idea to test whatever you use before getting into the project. The fumes from this solvent based adhesive smell lethal -- anything that smells that bad can't be good for you so I donned a half-face respirator. The cement is applied to both the enclosure and the back side of the veneer and allowed to dry to the touch. The directions advise two coats when working with absorbent materials, which almost certainly includes wood.
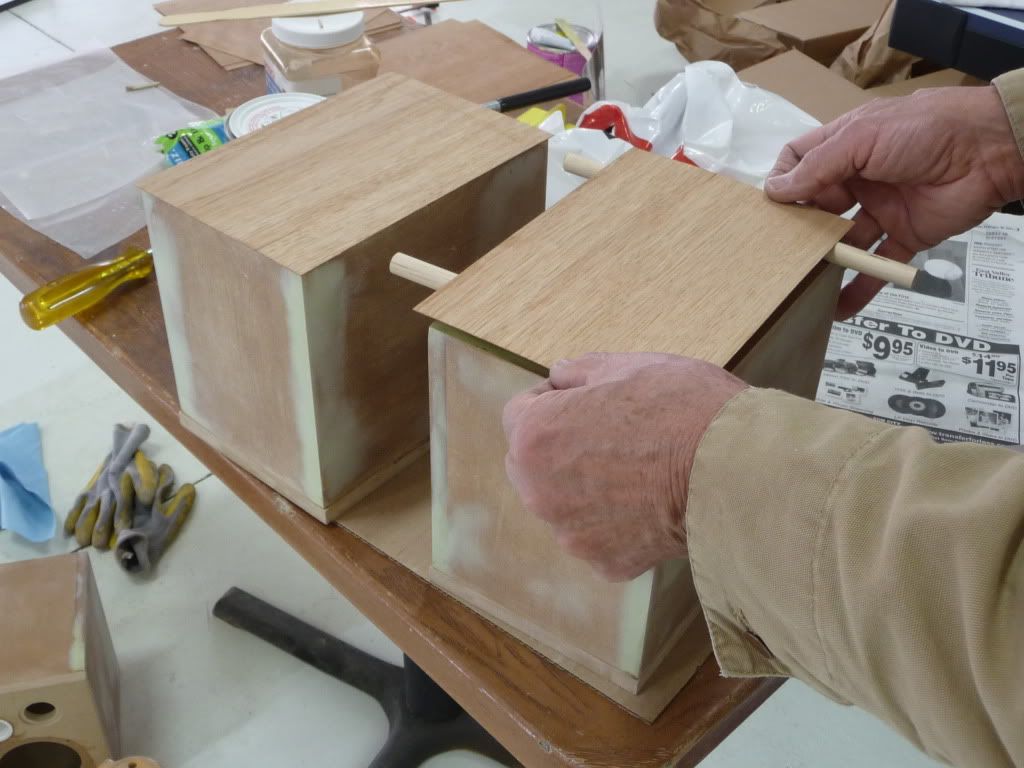
In an effort to minimize the visibility of the veneer seams, I decided to do the back first, followed by the sides so they would overlap the back piece, and the top last so it would overlap both the back and the sides. As soon as the adhesive becomes dry to the touch, the veneer must be applied before it dries completely. The trick is to not let the two surfaces touch until the veneer is positioned just where you want it. Once the two touch, the adhesive grabs and adjusting the position of the veneer isn't possible. This can be accomplished by using dowels to keep the surfaces apart until the veneer is positioned correctly, then carefully removing one dowel allowing one end to settle on the surface while the other dowel is removed.
Good to hear from you Beemain -- will you be using the new name from now on?
Anyways, happy to hear you had good success with the resin, I liked using it. Are you sure yours is unwaxed? Lots of the stuff sold in repair kit cans like that is with wax. The big difference with waxed is it gets harder but you can't layer it once dry. So if you were doing multiple layers of fiberglass you want unwaxed. Actually you can layer waxed but it requires sanding first, just a pain and not the right product.
After reading your post it occurred to me that I should credit you for the resin process. I went back and inserted a reference to your string at the point where I was beginning to discuss sealing the boxes...
Regarding the resin type, I bought it at an automotive paint store and it appears to be a good product -- the Evercoat brand should be reliable. But, I'm not sure how you can tell if it contains wax or not. I mentioned that to the clerk who seems knowledgeable enough about the paints and fillers, but he wasn't much help regarding the wax issue. However, it did work well. I didn't apply multiple coats though, without sanding at any rate.
Hope it warms up soon for you..., it must be frustrating waiting for the frigid weather to loosen it's grasp on the far north.
Good to hear from you Beemain -- will you be using the new name from now on?
After reading your post it occurred to me that I should credit you for the resin process. I went back and inserted a reference to your string at the point where I was beginning to discuss sealing the boxes...
Regarding the resin type, I bought it at an automotive paint store and it appears to be a good product -- the Evercoat brand should be reliable. But, I'm not sure how you can tell if it contains wax or not. I mentioned that to the clerk who seems knowledgeable enough about the paints and fillers, but he wasn't much help regarding the wax issue. However, it did work well. I didn't apply multiple coats though, without sanding at any rate.
Hope it warms up soon for you..., it must be frustrating waiting for the frigid weather to loosen it's grasp on the far north.
Thanks for the nice compliment Zach.
Thanks for the credit. Yes, this is the worst winter ever ... really it is. For this application is doens't really matter if it's waxed. If you buy a gallon of resin at a fiberglass shop it will say WAXED or UNWAXED in big letters. Home depot type stuff is generally waxed. "Industrial" stuff is really nice and you notice the difference, it's just smooth. As another side note, you can buy the wax in a little bottle and add a few drops to your top coat of fiberglass so it gets nice and hard, this saves you from having to buy both. Good write up, I got to get in gear and finish mine before you, haha
Great write-up you have going on here! One quick tip for you if you dont mind, Next time your working w/contact cement and veneer instead of using dowels as a spacer drop by your local wal-mart , target ..... and buy 1 of the cheapest venitian blinds they have usualy for around 5-6 dollars, throw away everything but the blades and use them as your spacers. The glue doesnt stick to the plastic and its just enough arch on the blind to keep the 2 surfaces seperated while everything is being lined up. Also if say you used 5 0r 6 across the back you can pull the middle one out and start working your way outward from the middle instead of side to side. Less likely to capture air bubbles. R.K.
I like the Red Lepai amp too. Looks like you have some tools I'd like to try out (like that spindle sander)
Let me know when you get back from your trip. Got some ideas (and drivers) for your hanger speakers. I'll definitely look forward to heading down to Chandler sometime before "real" summer hits.
Lou's Speaker Site [speakers.lonesaguaro.com] "Different" is objective, "better" is subjective. Taste is not a provable fact. Where are you John Galt? I may not be worthy, but I'm ready.
Really nice write up and build. I have gone thru a few "Binford" 12". 1st one snapped when I squeezed tight. Hasn't happened with the others since they all slip. And yes the screw type have been very good.
Too bad you don't have enough room to work.:rolleyes:
...throw away everything but the blades and use them as your spacers. The glue doesnt stick to the plastic and its just enough arch on the blind to keep the 2 surfaces seperated while everything is being lined up.
Great tip Randall -- I'm off to Wal Mart. Thanks, for sharing your technique.
Let me know when you get back from your trip. Got some ideas (and drivers) for your hanger speakers. I'll definitely look forward to heading down to Chandler sometime before "real" summer hits.
Lou -- I'm back. When I think about what all of that money spent on diesel fuel would buy in speakers, sigh..... Let me know anytime you're in the area, or when you'd like to visit, and we'll set something up. There's some interesting stuff to see here at Stellar, if you like airplanes and cars. Looking forward to doing a design with you -- I'll send a PM.
I have gone thru a few "Binford" 12". 1st one snapped when I squeezed tight. Hasn't happened with the others since they all slip. And yes the screw type have been very good.
Too bad you don't have enough room to work.
Hi Mark -- yep, you really have got to be careful when buying Binford stuff. I'll have to admit buying a lot of things there -- some have worked out very well, but a few were downright disappointing. I bought a bunch of their C-clamps; several of them turned out to be crooked, i.e., the frame was cast crooked. About the room I have to work in -- I'm pretty lucky in that regard I guess.
Great write-up you have going on here! One quick tip for you if you dont mind, Next time your working w/contact cement and veneer instead of using dowels as a spacer drop by your local wal-mart , target ..... and buy 1 of the cheapest venitian blinds they have usualy for around 5-6 dollars, throw away everything but the blades and use them as your spacers. The glue doesnt stick to the plastic and its just enough arch on the blind to keep the 2 surfaces seperated while everything is being lined up. Also if say you used 5 0r 6 across the back you can pull the middle one out and start working your way outward from the middle instead of side to side. Less likely to capture air bubbles. R.K.
Can you use wax paper between the enclosure and the veneer? Basically just tear off a piece(s) that's larger than the enclosure and place it on top of the enclosure, then place the veneer on top of that wax paper, then slide the wax paper out horizontally as you seal the veneer to the enclosure? It seems like I remember someone describing this method...although as I get older I may be thinking of something else. I just vaguely remember something about using wax paper to install something.:o
???Or, maybe that was the advice I was given for my wedding night???:eek:
[Duh] Oh, by the way, I would say that I'm really dense, but just to be clear, "Binford Tools" is another name for a retail tool outlet with the initials "H.F.", correct? [/Duh] :o
[Duh] Oh, by the way, I would say that I'm really dense, but just to be clear, "Binford Tools" is another name for a retail tool outlet with the initials "H.F.", correct? [/Duh] :o
Thanks,
Leonard
Thanks for the tip regarding wax paper (not many people even know what wax paper is nowadays it seem). I used a similar technique years ago working with Formica (plastic laminate) -- believe it or not a lot of craftsmen used newspaper. I was afraid it would stick to the contact cement, but it never did.
Regarding Binford tools, you're correct. You probably remember the old comedy show "Home Improvement" with Tim Allen -- their official tool sponsor was a mythical company named Binford. I've considered rebranding a few of my H.F. tools with the Binford name, just for the fun of it. I suspect a lot of people have Binford tools, and are embarrassed to admit it.
Can you use wax paper between the enclosure and the veneer? Basically just tear off a piece(s) that's larger than the enclosure and place it on top of the enclosure, then place the veneer on top of that wax paper, then slide the wax paper out horizontally as you seal the veneer to the enclosure? It seems like I remember someone describing this method...although as I get older I may be thinking of something else. I just vaguely remember something about using wax paper to install something.:o
???Or, maybe that was the advice I was given for my wedding night???:eek:
I personaly wouldnt try the wax paper trick, reason being there to much of a chance of tearing it when your pulling it out traping it in there. The plastic the blinds are made of are very tough and very thin and that slight little arch is the perfect height for holding it just about a 16th of an inch off of the substrate. As you remove one, you contact the two glued surfaces move to your next one and so on, this way everything stays perfectly aligned. Ive spent over 20 plus yrs in the Custom Cabinetry industry and Ive put down more Formica and Veneer than I care to remember and Ive yet to find any technique that is as fool proof as a set of cheep blinds. Thanks R.K.
I used the wax paper method when I did mine, but quickly learned to keep the paper out well ahead of where the glue is being pressed together. real easy to get the paper trapped between the veneer and substrate if you let the glue touch to close to the paper. real pain to get it out then. Also if the glue is not completely skinned over, the wet areas will stick to the wax paper. I like the miniblind idea and will probably try that next time.
Glad I could help guys! Like I said Ive owned my own Custom Cabinet and Furniture shop for 20 plus yrs and I also do alot of "One-off" custom pieces so the building and finishing aspect of it to me is second nature and I would be glad to help you guys out anyway I can. Where Im learning from you guys is the ART of making a speaker work ie driver selection, crossovers, building crossovers, how to dampen a speaker etc...... thats where I want to thank you guys and these great build threads because I could build the most stunning speakers in the world but If I cant make them work and sound right all Ill have in the end is a great looking place to sit my glass of tea. :D So thank you again. R.K.

 Tweet
Tweet

 I just vaguely remember something about using wax paper to install something.:o

Comment