Overnight Sensation Build -- Two Sets

Collapse
X
 
  • Time
  • Show
Clear All
new posts
  • Soundslike
    Seasoned Veteran
    • Feb 2010
    • 1080

    Overnight Sensation Build -- Two Sets

    This string will describe the steps involved in building a set of Paul Carmody's Overnight Sensation speakers. I arrived at the decision to build the OS for several reasons. My brother was visiting, and he told me he needed a small set of high fidelity speakers that would produce quality audio. He needed something compact that would fit into his home entertainment center, in the small shelf/cubicles designated for speakers. Paul's OS design caught my attention some time ago and since then, I've wanted to build a set that I'll use for my computer, on my workbench, and in my RV. Just as importantly, I'm always looking for an excuse to build a set of speakers. I thought that while I was at it, I may as well build two sets -- one for him, and one for me.

    This link will take you to Carmody's website where you can learn more about the Overnight Sensations and his other designs as well:


    This build will be of interest mostly to those who are considering an Overnight Sensation (OS) build, anyone who is new to speaker building and wants to know what's involved, or builders who are interested in seeing what processes others use to complete their projects (see update below). In all honesty, I'll have to admit that there are many far more competent builders than I who frequent this forum -- all one has to do is read the posts here and it becomes obvious that there are a lot of experienced and capable designers and builders here. But, in the hopes that some may benefit, I'll discuss woodworking, crossover building, my observations about veneering (I'm new to veneering), and finishing.

    UPDATE, 03.29.11 Since the posting of this introductory message, this thread has increased in scope considerably. Several members have offered their opinions and suggestions regarding better ways to do things, primarily pertaining to surface preparation, finishing, and veneering. Experienced builders will likely find those areas worth reading...

    Hoping to pique your interest, here's a couple of photos showing the end result:


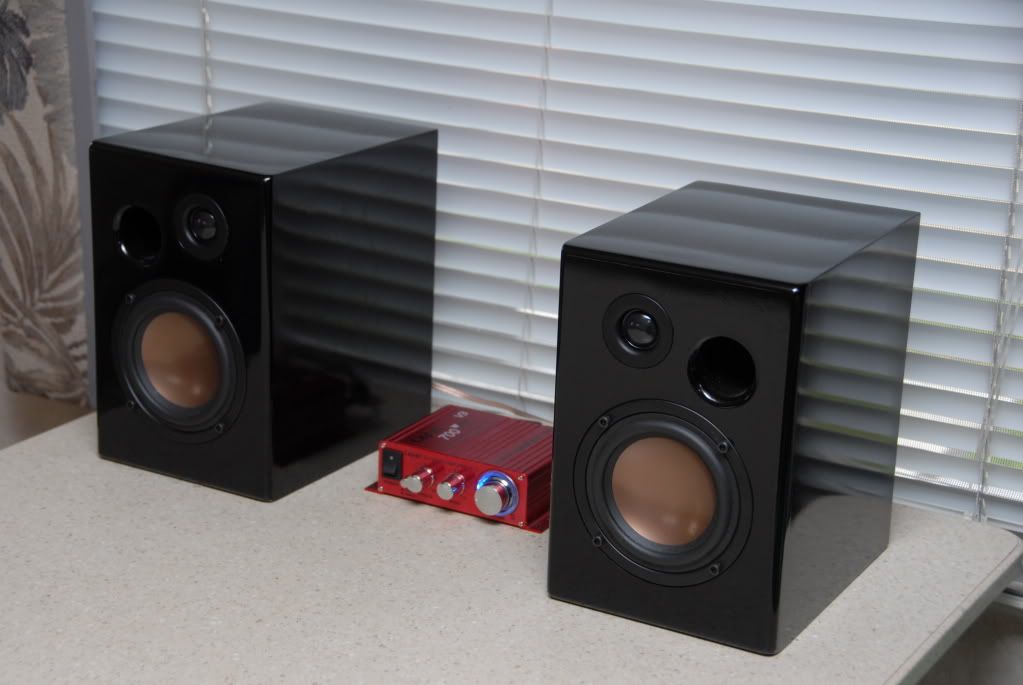
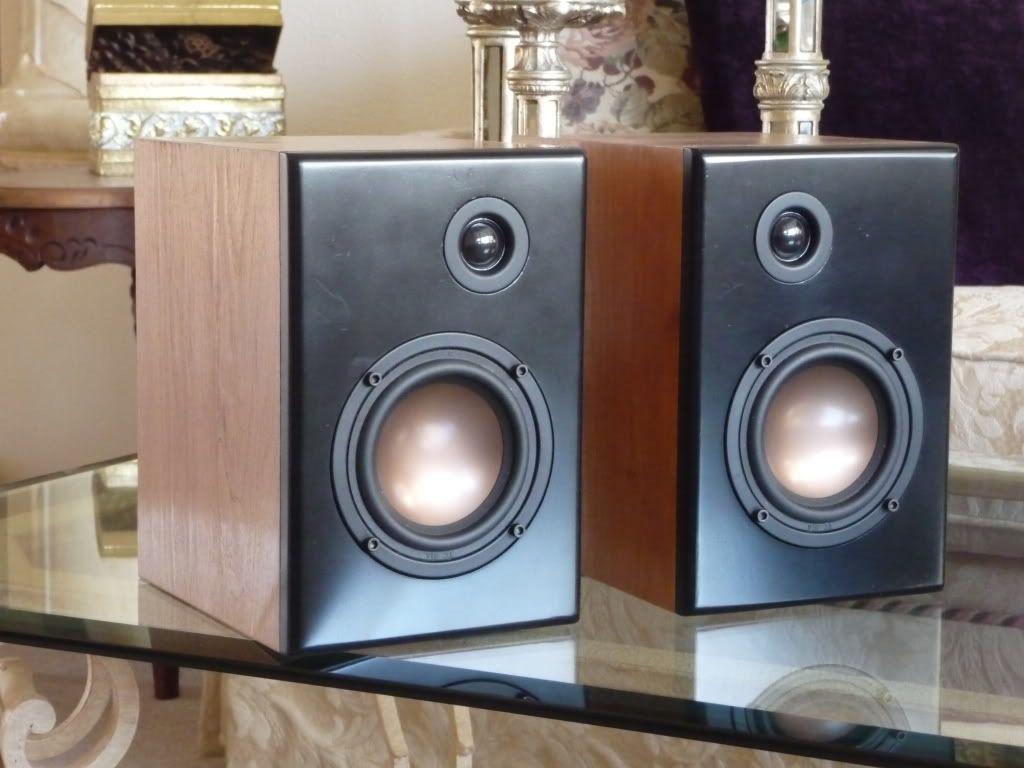
    As you can see, one set is finished in black, while the other is veneered with a semi-gloss black baffle. Also, the black set has the port vented to the front, while the veneered set are ported to the back. I apologize for the mediocre quality of the black photo -- immediately after completing the build, I went on a long RV trip to Texas where I realized that I didn't have any finished photos of the speakers. I brought the black set along with me to give to my brother and realized at the last minute that would be my last opportunity to photograph them. We snapped a few photos in his RV, but black is difficult to photograph well. Wish I had more time. Maybe he can send me a better photo.
    Last edited by Soundslike; 03-29-2011, 04:30 PM.
    Tritrix HT:http://techtalk.parts-express.com/sh...d.php?t=222519
    Dayton 12" Subwoofer: http://techtalk.parts-express.com/sh...d.php?t=222930
    Overnight Sensations: http://techtalk.parts-express.com/sh...d.php?t=223751
    Cerberus sub: http://techtalk.parts-express.com/sh...hlight=cerebus
    Duellatis: http://techtalk.parts-express.com/sh...d.php?t=224943
    NTN's: http://techtalk.parts-express.com/sh...d.php?t=227902
  • devinkato
    Midrange Member
    • Mar 2011
    • 439

    #2
    Re: Overnight Sensation Build -- Two Sets

    Do you prefer the port in the front or in the back - sound wise?

    Comment

    • Soundslike
      Seasoned Veteran
      • Feb 2010
      • 1080

      #3
      Re: Overnight Sensation Build -- Two Sets

      I like to begin by drawing the project to scale, using a CAD program I've had for years. If you have that capability, it's worth doing because it helps anticipate what the project will involve. Many potential problems can be solved, or avoided entirely, by first drawing the project. Here's the drawing I produced. The two side views were drawn because of the two different port configurations.


      Even though the dimensions are available elsewhere, I usually measure the drivers with a caliper. I have a large one purchased at Harbor Freight -- it's a Binford. Those who remember Tim Allen's old sitcom "Home Improvement," will recognize the Binford brand. I rebrand everything I buy at Harbor Freight Binford, hoping to avoid the sneers and jeers of the elite brand owners.;)

      Back to the point -- getting an accurate dimension makes a good fit possible, and more importantly, avoids the occasional too-small cutout.


      Following the dimensions arrived at during the drawing process, I cut out the various small panels needed to produce four speakers. The enclosures are made entirely of 1/2" Medium Density Fibreboard (MDF). Next, following my usual process, I used a compass to draw the circles on the baffles that defined the location and size of the driver cutouts. I also drew the port locations for the set that has front port exits. A front port configuration was chosen for the set that was to be my brother's, since he planned to put the speakers in recessed areas formed by the shelves, back, and sidewalls of his home entertainment center. The front location seemed a better arrangement in his situation as opposed to a more standard rear port which would have vented into an enclosed area (described in the previous sentence).


      The cutouts for the small Dayton ND20 tweeters were made using Forstner bits. The tweeter is sized according to the metric system and it's size doesn't correspond to a standard fractional inches system size. The tweeter is a press-fit, meaning it is not held in place with fasteners, so a tight fit is highly desirable. You can of course, resort to using glue to secure the tweeter in place. Bill Schneider, a builder, known for his high precision, bit the bullet, so to speak, and bought a 45mm Forstner bit in order to get a precise fit. If you're building the Overnight Sensations, do yourself a favor and take a look at his build string:

      I've made the plunge and purchased parts for what should be a fun build project - the Overnight Sensations designed by Paul Carmody. I am one of the slowest


      In my case, I opted to use a 1 3/4" Forstner bit which produces a hole slightly smaller than needed. 1 3/4" equals 44.5mm so a bit of enlarging by hand will be necessary. The foregoing pertains to cutting a recess for the tweeter, in order to flush mount it. A second hole, cut completely through, is necessary to provide clearance for back side of the tweeter. This hole needs to be 1 5/16" in diameter. Here again, the typical set of Forstner bits won't include one of the exact size needed. You'll probably have to do as I did and cut a 1 1/4" hole and enlarge it a bit. Fortunately, all of this enlarging isn't as tough as it sounds.

      Forstner bits, used as intended, rely on a center point to locate the bit as it removes material. That means to make the cutout described, one has to follow the proper sequence. First, drill a small hole (1/16" should do the trick) where the center of the cutout will be. Drill completely through, making sure that the hole is perfectly perpendicular to the surface -- a drill press, or a great deal of care is required. Next, bore the 1 3/4" hole down to the necessary depth to make the tweeter flush when installed -- this will require some method of limiting the depth of the cut. In my case, I bored the relief to 3/32" in depth. Set the depth gage if you're using a drill press. If you bore the hole too deep, it can be shimmed up to the proper depth using non-corrugated cardboard or thick paper, and glue. After cutting the recess, bore the 1 1/4" hole completely through the baffle using the 1/16" hole drilled previously as the center point.


      Once the holes are bored, they must be enlarged. I used a spindle sander for the through-hole. Coarse sandpaper on a closet dowel, or a drum sander mounted in a drill press would also work fine.


      Enlarging the recess is a bit more complicated and must be precisely done, if a good fit is to be achieved. I used a two step process. First, I gouged out a small amount of material with a utility knife held at an angle so that only the bottom edge is enlarged.


      Next, a bit of scrounging around turned up a large socket with an outside diameter just about the same as the recess diameter. I wrapped sandpaper around the socket and carefully sanded the upper edge of the recess out to the line previously drawn with the compass. It doesn't take much -- only an additional .5 mm is needed.


      Of course, the whole issue can be avoided if one follows Paul's advice and surface mounts the drivers. That makes a whole lot of sense, but, sigh, it's hard to be sensible when you're trying to build something pretty....
      Tritrix HT:http://techtalk.parts-express.com/sh...d.php?t=222519
      Dayton 12" Subwoofer: http://techtalk.parts-express.com/sh...d.php?t=222930
      Overnight Sensations: http://techtalk.parts-express.com/sh...d.php?t=223751
      Cerberus sub: http://techtalk.parts-express.com/sh...hlight=cerebus
      Duellatis: http://techtalk.parts-express.com/sh...d.php?t=224943
      NTN's: http://techtalk.parts-express.com/sh...d.php?t=227902

      Comment

      • Soundslike
        Seasoned Veteran
        • Feb 2010
        • 1080

        #4
        Re: Overnight Sensation Build -- Two Sets

        Originally posted by devinkato
        Do you prefer the port in the front or in the back - sound wise?
        I don't think it makes any difference. I didn't notice any difference between the two sets, but then, I didn't have the time to do a careful comparison. I did research the question in the tech talk forum. The designer, Paul Carmody, responded that he didn't think there would be any difference at all. Still, the only reason I can think of to put a port on the front , is when the speaker will be placed within a tight, enclosed area. Here's a link to the string where I posed the question about port placement:

        Want a second or third opinion about your speaker cabinet design or other audio related problem? Post your question or comment on the Technical Discussion Board. Hundreds of technicians, engineers, and hobbyists, nationwide read and discuss electronics related questions each week. We welcome your participation
        Tritrix HT:http://techtalk.parts-express.com/sh...d.php?t=222519
        Dayton 12" Subwoofer: http://techtalk.parts-express.com/sh...d.php?t=222930
        Overnight Sensations: http://techtalk.parts-express.com/sh...d.php?t=223751
        Cerberus sub: http://techtalk.parts-express.com/sh...hlight=cerebus
        Duellatis: http://techtalk.parts-express.com/sh...d.php?t=224943
        NTN's: http://techtalk.parts-express.com/sh...d.php?t=227902

        Comment

        • Soundslike
          Seasoned Veteran
          • Feb 2010
          • 1080

          #5
          Re: Overnight Sensation Build -- Two Sets

          I read a post in another thread where a builder reported limited bass response because he hadn't beveled the edges inside the enclosure around the driver cutout. I used the spindle sander again, holding the baffle at an angle against the rotating sanding drum until I removed what I thought would be an adequate amount from each quadrant, between the driver mounting holes. I chose not to remove too much material because the baffle is only 1/2" to begin with.


          I elected to use a biscuit plate joiner (and biscuits, of course) to join the various component panels together. In this next photo, you can see placement of the biscuits.


          I've had the plate joiner for years, but I've only used it on a few projects. I find it a little cumbersome to use but the method does add a lot of strength to the joint. This method also makes it possible to glue up the entire assembly in one sitting, so to speak, rather than joining one or two pieces together, waiting for them to dry, then adding another piece or two. And the method does help to align the pieces and prevents movement (glue can be slippery stuff). It's simple enough when all pieces are the same thickness, and size, but in this build I made the front baffle oversized because I wanted to veneer the enclosure on one of the sets, from the baffle back. The baffle's edges were to be exposed and I wanted to make sure they were flush with the surface of the veneer -- so I glued on an oversized baffle, added the veneer (more on that later) and then used a flush bit in a router to trim the baffle to size. The oversized baffle made it difficult to accurately locate the biscuit slots -- they had to be set in an additional distance to compensate. Screws would have been easier, but as I've mentioned in other build strings, they also tend to get in the way when rounding over the edges.
          Tritrix HT:http://techtalk.parts-express.com/sh...d.php?t=222519
          Dayton 12" Subwoofer: http://techtalk.parts-express.com/sh...d.php?t=222930
          Overnight Sensations: http://techtalk.parts-express.com/sh...d.php?t=223751
          Cerberus sub: http://techtalk.parts-express.com/sh...hlight=cerebus
          Duellatis: http://techtalk.parts-express.com/sh...d.php?t=224943
          NTN's: http://techtalk.parts-express.com/sh...d.php?t=227902

          Comment

          • beemain
            Been Around Awhile
            • Jan 2011
            • 63

            #6
            Re: Overnight Sensation Build -- Two Sets

            Nice work. How do they sound? Can't wait to finish mine

            Comment

            • Soundslike
              Seasoned Veteran
              • Feb 2010
              • 1080

              #7
              Re: Overnight Sensation Build -- Two Sets

              Originally posted by beemain
              Nice work. How do they sound? Can't wait to finish mine
              They sound great -- I had one set playing while I finished the other and I'm really pleased with them. I took them along when I went to the Arizona Speaker Fest-- several people wanted to hear them having read about the many builds on the PE board. They were well received in their cost category. I'm going to build the Cerberus sub too -- I recall that's what you plan to do as well. By the way, I used the resin/acetone mix you talked about to seal the entire enclosure. I used one of Evercoat's products and it worked very well. I'll be describing the experience later on in this string. I'll be following your build to see the final result and to hear what you think of them...
              Tritrix HT:http://techtalk.parts-express.com/sh...d.php?t=222519
              Dayton 12" Subwoofer: http://techtalk.parts-express.com/sh...d.php?t=222930
              Overnight Sensations: http://techtalk.parts-express.com/sh...d.php?t=223751
              Cerberus sub: http://techtalk.parts-express.com/sh...hlight=cerebus
              Duellatis: http://techtalk.parts-express.com/sh...d.php?t=224943
              NTN's: http://techtalk.parts-express.com/sh...d.php?t=227902

              Comment

              • Hunter12
                Been Around Awhile
                • Feb 2011
                • 62

                #8
                Re: Overnight Sensation Build -- Two Sets

                Fantastic!

                Paul's gift is designing these angel's and yours is producing them.
                Be true to the cause and build a Pony sub as apposed to the
                Cerbus. (RSS210 I believe)

                Thank's for the inspiration, it shows one what is possible.

                Comment

                • ericJ
                  Been Around Awhile
                  • Aug 2010
                  • 164

                  #9
                  Re: Overnight Sensation Build -- Two Sets

                  As always, stunning work, great pictures, and great descriptions. These threads really do help novices like myself. The second pair is the look I am aiming for with my Nano Neos. Could you elaborate on the veneer? Is the front baffle removable?

                  Once again, great work. Thanks for sharing!

                  Comment

                  • Paul Carmody
                    Seasoned Veteran
                    • Nov 2006
                    • 5951

                    #10
                    Re: Overnight Sensation Build -- Two Sets

                    Wow. That's really high-quality work there! Thank you very much for detailing your steps. I was a noob once myself, and I remember how much it helped to see and read others' experiences in building cabinets.

                    The most humorous thing about people building this speaker (to me, anyway) is the amount of painstaking labor put into flush mounting the $8 tweeter. Me, whenever I have to flush mount, I look at my Jasper Jig and find the closest notch and go at it. I really admire the work of people like yourself who have the patience to do such precise work.
                    Isn't it about time we started answering rhetorical questions?

                    Paul Carmody's DIY Audio Projects
                    Twitter: @undefinition1

                    Comment

                    • Soundslike
                      Seasoned Veteran
                      • Feb 2010
                      • 1080

                      #11
                      Re: Overnight Sensation Build -- Two Sets

                      Be true to the cause and build a Pony sub as apposed to the
                      Cerbus. (RSS210 I believe)
                      That's a possibility I hadn't considered, mostly because I'd forgotten about Paul's string where he introduced the idea of three different enclosure designs. Your suggestion sent me scurrying around to find it. But, the Pony and the Turtle are all bigger physically, than what I have in mind. And, they are likely better performing than what I need. Still...

                      Could you elaborate on the veneer? Is the front baffle removable?
                      Later on in the string (I have a lot more to post) I'll describe my experience with the veneer. I'll be using more of it in the future, but it's not without its challenges. As for the baffle, they aren't removable. In my opinion, up to now at least, removable baffles are unnecessary with front-mounted drivers. I typically size the crossover so that it will fit through the driver opening and I rely on some type of adhesive to hold it in place. Wiring is a little more complicated because you have to work through the driver opening and you'll want to have all the wire connections to the network made before inserting it into the enclosure. It might have made it a little easier to fit and paint the black baffle onto the veneered cabinets though.

                      ...the amount of painstaking labor put into flush mounting the $8 tweeter. Me, whenever I have to flush mount, I look at my Jasper Jig and find the closest notch and go at it.
                      Thanks for the comments Paul -- nice to hear that you approve of what I've done with your design. Regarding the amount of work devoted to what was meant to be an uncomplicated easy to build design, I'm guessing that if I had your design capabilities I'd probably focus more on coming up with new speakers that work well -- that has to be very gratifying. But, I don't expect to ever be a really competent designer, and I do like wood working, so that's where I place the emphasis. I suspect a lot of other builders are like me. The quality of the finished OS builds, and your other designs, is a strong indication of how much other people think of your speakers.
                      Tritrix HT:http://techtalk.parts-express.com/sh...d.php?t=222519
                      Dayton 12" Subwoofer: http://techtalk.parts-express.com/sh...d.php?t=222930
                      Overnight Sensations: http://techtalk.parts-express.com/sh...d.php?t=223751
                      Cerberus sub: http://techtalk.parts-express.com/sh...hlight=cerebus
                      Duellatis: http://techtalk.parts-express.com/sh...d.php?t=224943
                      NTN's: http://techtalk.parts-express.com/sh...d.php?t=227902

                      Comment

                      • Soundslike
                        Seasoned Veteran
                        • Feb 2010
                        • 1080

                        #12
                        Re: Overnight Sensation Build -- Two Sets

                        The enclosures were glued up using Titebond and clamps, all in one session. Naturally, the number of suitable clamps one has available will limit how far you can go in one session, before stopping to let things dry. You may notice more than a few of the "Binford" brand clamps in the mix. I find the screw types to be more effective than the mostly plastic squeeze types. Most woodworkers will advise applying a thin layer of glue on each surface. A small brush works well to ensure 100% coverage. For speakers, it's better to use too much glue than too little for two reasons. First, the primary reason for using glue sparingly is to avoid, as much as possible, glue squeeze out -- that doesn't matter unless the glue is deposited on a surface that is to have a natural finish, e.g., wood with a stain and clear finish. Glue smeared around on a project will result in a blotchy finish because of the different rates at which the wood absorbs finishing materials. If the project will be painted, or veneered, the glue can be easily removed. Secondly, it's important that the joints be airtight, or nearly so, in a speaker cabinet.

                        Regarding glue types, I haven't yet found any real benefit to using some of the more exotic glues now available. Gorilla glue, is often mentioned but I find it advantageous only when there are gaps to be filled by the glue. Urethane types expand during the drying process and do a good job of matching poorly fitting parts but it does have a tendency to make a mess.

                        A word about the assembly sequence: As I mentioned previously, one set of these speakers were to be veneered but I wanted to paint the baffle black, for contrast. The edges of the baffle were to be painted also. That arrangement meant that a part line would exist on the top and sides where the baffle ended, and the veneer began. I wanted the edge of the baffle to be flush with the surface of the veneer and that necessitated waiting until the veneer was applied, before trimming the baffle to its final size. The following sequence was adhered to:

                        1. Assemble the enclosure without the baffle.
                        2. Sand the enclosure to final shape and size.
                        3. Glue on the baffle.
                        4. Veneer the top, sides and back.
                        5. Trim the baffle with a flush trim bit.


                        Tritrix HT:http://techtalk.parts-express.com/sh...d.php?t=222519
                        Dayton 12" Subwoofer: http://techtalk.parts-express.com/sh...d.php?t=222930
                        Overnight Sensations: http://techtalk.parts-express.com/sh...d.php?t=223751
                        Cerberus sub: http://techtalk.parts-express.com/sh...hlight=cerebus
                        Duellatis: http://techtalk.parts-express.com/sh...d.php?t=224943
                        NTN's: http://techtalk.parts-express.com/sh...d.php?t=227902

                        Comment

                        • Paul Carmody
                          Seasoned Veteran
                          • Nov 2006
                          • 5951

                          #13
                          Re: Overnight Sensation Build -- Two Sets

                          Ha. I have quite a few "Binford" tools in my garage. I'm just a weekend warrior, so they pretty much work fine for me. Mostly.
                          Isn't it about time we started answering rhetorical questions?

                          Paul Carmody's DIY Audio Projects
                          Twitter: @undefinition1

                          Comment

                          • Soundslike
                            Seasoned Veteran
                            • Feb 2010
                            • 1080

                            #14
                            Re: Overnight Sensation Build -- Two Sets

                            After assembling the enclosures, I turned my attention to surface preparation. I treated both sets of cabinets in the same manner -- having read several recommendations for using body filler (often referred to generically as Bondo, even though there are many other, and often better, products), and fiberglass resin, I decided to give these materials a try. The products most often recommended seem to be made by Evercoat -- specifically Evercoat's Rage Gold. I've also been advised to avoid the more common resin brands because they frequently contain wax which can complicate the finishing process.


                            Captainobvious99 used these products to good advantage in a build described here:

                            Show off your speaker projects by posting the details and images of your creations. We encourage you to discuss with the speaker project designer his methods and results.


                            Before using the filler to fill surface defects, it is advisable to seal the MDF. Sealing is often discussed in the Tech Talk Forum and there are many different processes. I've used several different methods on various projects in the past with varying degrees of success. In this build, I used fiberglass resin thinned by adding 30% acetone. The resin I chose is also an Evercoat product. In the next photo, I'm brushing the resin on the top -- notice the penetration of the exposed edges. Eventually, I coated the entire enclosure with the resin.


                            Beemain discusses the use of resin, filler, and epoxy in his thread here.

                            The resin penetrated well into the MDF and permanently sealed the troublesome exposed edges. I found it relatively easy to sand, once well cured. Applied with a brush, it does have a tendency to leave brush marks -- it doesn't flow out as well as a good quality paint product. The brush marks sanded out well, using a sanding block and 150 grit sandpaper.


                            This photo shows the four enclosures, with the yet to be attached baffles, after sealing with resin. Initially, I intended to treat the baffles with resin only around the driver cutouts and port openings, to strengthen the material. Eventually, it became obvious that the best course would be to coat the entire baffle. The resin requires about six hours minimum to cure, but you'll experience less sandpaper clogging if the material is allowed to cure overnight.


                            I hand sanded the sealed enclosures with a sanding block, avoiding the use of power sanders to avoid over sanding the edges. It's important to check the sandpaper regularly for indications that the resin is starting to clog the paper by building up in multiple, tiny accumulations, that hold the abrasive paper away from the surface, and scratch it up in the process. Rotating work surfaces frequently helps to minimize the problem, as does removal of accumulated dust on the sandpaper with a blast of compressed air. These troublesome accumulations seem to occur when friction produces heat and rotating helps alleviate that problem. You'll also have better luck if you change the sandpaper regularly.

                            The Evercoat resin does sand well, and does an excellent job of sealing the MDF.

                            After thoroughly sanding the enclosures, my next step was to fill any surface defects with the Evercoat Rage Gold automotive body filler. It applies amazingly well, until it begins to cure, right on schedule around 10-12 minutes after mixing. The filler can be sanded after about 20 minutes of curing time. The Evercoat filler sands very well -- it can be removed with minimal effort and feathers amazingly well. It can also be sanded to an form an edge where necessary. I'm very impressed with this product, but it isn't cheap and isn't available at home improvement centers and consumer oriented auto parts stores. I wasn't able to find it in small amounts and ended up buying a gallon. I found the Evercoat products at an automotive paint supply store. It is most likely available through Internet suppliers.

                            Last edited by Soundslike; 03-24-2011, 10:40 PM. Reason: Credited Bemain for resin suggestion..
                            Tritrix HT:http://techtalk.parts-express.com/sh...d.php?t=222519
                            Dayton 12" Subwoofer: http://techtalk.parts-express.com/sh...d.php?t=222930
                            Overnight Sensations: http://techtalk.parts-express.com/sh...d.php?t=223751
                            Cerberus sub: http://techtalk.parts-express.com/sh...hlight=cerebus
                            Duellatis: http://techtalk.parts-express.com/sh...d.php?t=224943
                            NTN's: http://techtalk.parts-express.com/sh...d.php?t=227902

                            Comment

                            • Mikers
                              Been Around Awhile
                              • Mar 2011
                              • 216

                              #15
                              Re: Overnight Sensation Build -- Two Sets

                              Looks really good. Love the black

                              This is actually Beemain, I got logged out and forgot my password and for some reason the reset isn't working, ahhhh


                              Anyways, happy to hear you had good success with the resin, I liked using it. Are you sure yours is unwaxed? Lots of the stuff sold in repair kit cans like that is with wax. The big difference with waxed is it gets harder but you can't layer it once dry. So if you were doing multiple layers of fiberglass you want unwaxed. Actually you can layer waxed but it requires sanding first, just a pain and not the right product. Sorry, got off topic

                              I really want to finish mine now but conditions are not good for painting, oh well it should warm up soon.

                              Comment

                              Working...